
CHOOSING
TIMBERS
I
have to say, I am walking in the dark as far as this blogging goes (this is a
real problem as I normally use a wheelchair). I have no idea how it works, but
as I am not a person who gives up, I will sort it out.

I
have decided to use some West Australian Jarrah, (Jarrah is a very hard and brittle wood and I expect to encounter a few broblems) I had left over from a recent BBQ
renovation. I use recycled or reclaimed timbers whenever possible (maybe i'm a tight wad), the leaves I
plan on using a (I don’t know what it’s called) piece of green timber, some
Purple heart for the flower, Australian red cedar for the stems and edge
inlays.

I cut
the veneer approximately 2mm (3/32”) thick, note the screw holes, l will explain how I deal
with this shortly.

Next
I square up the veneer. Here you will notice that I am using one of the aids I
have developed. This one I use to clamp the veneer to the bench and square up the saw, this
is due to my inability to stand up, and look down over the saw as would normally be
the case.

With painters and two sided tape, I stick the veneer to the bench and using
some homemade scrapers (I will at a later time show how I have made them), I
smooth one surface of the veneer.

Another
of my devices this one is a router on a sled, (a poor man's thicknessor, or (gizmo)), this I use to get a flat surface
for the face of the veneer. Again as I can’t stand up to use a hand plain, I have
had to improvise. Using painters and two sided tape on the roughly smoothed
face, I secure the veneer to the gizmo table.

Run the router across
the surface of the veneer until flat, remove the veneer from the gizmo.

With
the screw holes, I take a piece of the same timber that matches in colour and grain, For
the purpose of this exercise, I will use matched colour in one defect and
slightly unmatched in the other, to show the difference in the two. Securely
tape to the reverse of the veneer.
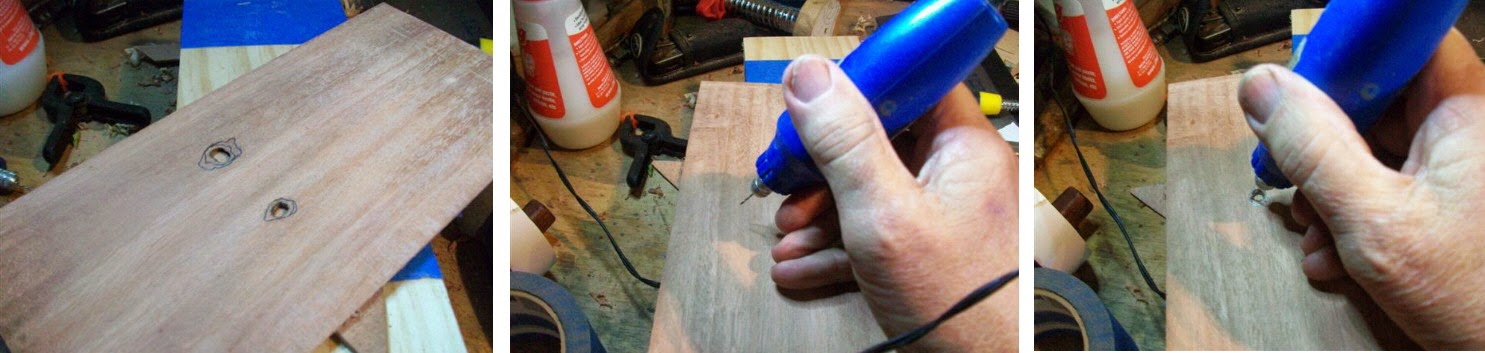
I
have drawn circles to add contrast only. With a 1mm drill bit, drill through
both pieces at an angle of about 10 degrees (this is to hide the saw entry hole).

Using
a scroll saw I cut around the defect area, remove from the saw, separate the
pieces and glue around the edge of the cut out.

Place the pieces cut
from the backing timber in their respective holes.

Then
using a small scraper, I smooth both surfaces. It is perfectly obvious which hole
was filled with the matched colour.
I
have just noticed a floor in the veneer, there is a crack running the full
length of the timber not visible to the camera but something that will effect the finished product. I will leave this as is and deal with it at an opportune moment.
No comments:
Post a Comment